Back from the dead...
I'll keep it sort that I got MAJOR burn out with trying to paint this kit, a Paint shop damaging my armor without refunding me, and needing to finish my TK before Weird Al came to my city...
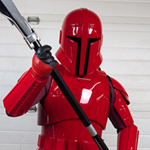
Anyhow I finally got it painted...
I'm going to guess IS fixed this by now but made my own template for the two missing stickers for the "Pill Boxes" I used the Strip meant for the FOTK TD. Also added the elastic strapping inside.


I've been a fan of using a Zipper to close the rear instead of blindly having to reach for snaps or velcro so used this to close the AB.


Don't know what else to call it but went with a Cummerbund like my Scout Trooper for the Skirt. Thanks to Andy/andyman97 build thread for providing a starting point on measurements for the skirt panels itself.

The base of it without the panels before sewing it.

I converted the Skirt Template into a CAD Drawing so I can print it out and use it as a template. Can't figure out how to attach files to the post... worse case I'll make a google drive link if needed. I also uploaded it to the Facebook group. I did use the template as a BASELINE so mine is a little different from the original as everyone is different. I adjusted it as I tested it on some some throwaway fabric.


Poor mans weight to keep the fabric still with water bottle lol, after adjusting the template and preparing to cut

Test Fit after cutting my first panel

Test Fit of all the panels on the cummerbund pinning it in place


Close up on my closure point. I sewed half of the front panel on my left side and it's a velcro closer to the right


On to more strapping of other stuff...