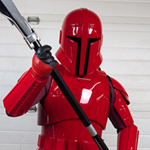
LVLAsian's Imperial Surplus Praetorian Build

User avatar
LVLAsian
Posts: 26
Joined: Fri Mar 23, 2018 1:58 pm
TKID: 31139

LVLAsian's Imperial Surplus Praetorian Build

Post by LVLAsian »

Going to try logging my Build Progress of my Imperial Surplus Praetorian build here.

Parts
Helmet - Imperial Surplus
Armor - Imperial Surplus
Undersuit - Crowprops
Gloves - Crowprops
Shoes - Crowprops
Skirt - Field Fabrics (Ultrasuede(R) HP (Ambiance) #1367 Red Fabric)
Weapon- TBD

Image
Image

I per-ordered the helmet a year ago before the armor came out. Great resin casted helmet, came with the visor and everything. Not much to it aside from cutting out the visor and cleaning up the bottom edge of the helmet a little.

Image
Image

User avatar
LVLAsian
Posts: 26
Joined: Fri Mar 23, 2018 1:58 pm
TKID: 31139

Re: LVLAsian's Imperial Surplus Praetorian Build

Post by LVLAsian »

Wanted to get his knocked out

I want to do the Electro-Halberd as my primary. Downloaded the V2 of the Empire3D model but added more details that IMO is more accurate to what it is in the show as well as adding a metal stock through the blade and handle (orange thing) to make it durable.

Image

Image

Image

Image

Image

User avatar
LVLAsian
Posts: 26
Joined: Fri Mar 23, 2018 1:58 pm
TKID: 31139

Re: LVLAsian's Imperial Surplus Praetorian Build

Post by LVLAsian »

Got some time to work on my forearms, trimming is straight forward and easy. Surplus supplies resin greeblies for the T-tracks and cover strips to be glued on.

Image

Image

T-Tracks Glue on
Image

Next Coverstrips
Image
Image

Leaving on side open to fit my hand through
Image

Gluing on the other half
Image

Repeat on other forearm and calling it done for now, going to fill/bondo the seams later down the line
Image

User avatar
LVLAsian
Posts: 26
Joined: Fri Mar 23, 2018 1:58 pm
TKID: 31139

Re: LVLAsian's Imperial Surplus Praetorian Build

Post by LVLAsian »

Also asked KW/Imperial Surplus for calcification on the chest plate this was his reply. I have fully built his previous FOTK so some changes to his previous molds

Image
Image

The Bottom "Lock"
Image

Also for this part too as this is new to me.
Image
Image

I drew a quick sketch to see if this lines up with what he says and aside from the velcro needing to be closer to the edge, this is how it is intended to be
Image

Now not sure if I'll will be doing/using the top two "pins" to lock in the chest because the hole for the yolk doesn't fit my head at the moment.... so going to revisit later when I decide to assemble the yolk itself as it comes in 3 pieces

User avatar
LVLAsian
Posts: 26
Joined: Fri Mar 23, 2018 1:58 pm
TKID: 31139

Re: LVLAsian's Imperial Surplus Praetorian Build

Post by LVLAsian »

Spats are easy enough, may try hot water bathing them to close it easier before painting

Image
Image
Image

Very little flashing I had to trim for the shoulder and biceps so it was mostly marking it with a pencil and grinding it down with a dermal

Image

Only concern I have is the bicep wall that holds the cover fabric is a bit thin compared to the rest of the pieces, may reinforce later so going to think about it later.

User avatar
LVLAsian
Posts: 26
Joined: Fri Mar 23, 2018 1:58 pm
TKID: 31139

Re: LVLAsian's Imperial Surplus Praetorian Build

Post by LVLAsian »

Hip plates

I decided to go with resin printing my own box that goes on the top plate, as the vac formed one feels like it will be a bit of a pain to glue and stay on.

Image

Image

Image

Image


Shins

My bad habit kicked in and forgot to take a pic of how I clamped it while the glue was drying. But it's straight forward, only glue shut the outside of the shins. The insides needs to be the closing point

Image

the "Kit kat" I glue one of a time. There are arrows on the flashing to show which way to point them, marked them with a sharpie to make sure it's correct

Image

Image

Used JB Plastic Weld to make sure it doesn't go anywhere
Image

Image

I glued the rear kit kat the next day after sanding off the glue that might of leaked out

Image

User avatar
LVLAsian
Posts: 26
Joined: Fri Mar 23, 2018 1:58 pm
TKID: 31139

Re: LVLAsian's Imperial Surplus Praetorian Build

Post by LVLAsian »

Abdomen

Comes in two pieces and need to take the belt skirt off as it's not a FOTK

Image

Image

Assembly feels almost the same as the last one I did (Previous one didn't have the belt skirt)

How I did mine was mark off the join points with a sharpie and use the #1 box (Right side) and #7 box to make sure the closer is correct before gluing it down. The box location sticks out and the boxes should fit into the slots so easy to tell if it's correct or not.

Image

Image

Gluing it down with JB Weld again

Image

I only did one side at a time (per night after work) to make sure it bonds, I do not recommend cutting the back slot until you do the sides first. I plan on doing the boxes later down the line

Image

User avatar
LVLAsian
Posts: 26
Joined: Fri Mar 23, 2018 1:58 pm
TKID: 31139

Re: LVLAsian's Imperial Surplus Praetorian Build

Post by LVLAsian »

Yolk/back

Now I don't think I have that big of a head... but the yolk barely fits to the point it's a little painful to take off...

My head is 6.5" across for comparison

Image

Otherwise the Yolk/back comes in 3 parts

Image

For the connecting parts I would sand down the return edge expect the outside. It doesn't serve a purpose far as I can tell and doesn't line with with the front or back. It makes it easier to glue and wont dig into you wearing it

Image

The "fun" part, I used almost an entire tube of JB weld for his to make sure it bonds because you want to make sure this part is strong from the amount of stress is takes, plus allows me to shift it around before it hardens

Image

You will need a lot of very strong magnets, clamps and duct tape to hold everything down

Image

Image

Will cont. adding the Back to the Yolk later

User avatar
LVLAsian
Posts: 26
Joined: Fri Mar 23, 2018 1:58 pm
TKID: 31139

Re: LVLAsian's Imperial Surplus Praetorian Build

Post by LVLAsian »

Yolk/Back Cont.

As I said in my previous post, this is the reason you really don't need/want a return edge (in my opinion) on the connector

Image

Left the connector return edge "raw" so I can sand down to the same edge of the main yolk

Image

Image

Sanded down the connector again to get rid of any glue that may have leaked out
Image

A lot of JB Weld again, don't forget to add some to the return edge too

Image

Again, get you magnets, clamps and duct tape. The duct tape really helps with forcing the edge to line up the back to the yolk as it's hard to find good clamp/magnet placement.

Image
Image
Image

User avatar
LVLAsian
Posts: 26
Joined: Fri Mar 23, 2018 1:58 pm
TKID: 31139

Re: LVLAsian's Imperial Surplus Praetorian Build

Post by LVLAsian »

Back/Yolk Assembly

Post gluing not perfect but it's on there, sanded it down a bit

Image

Image

Image

Before I use bondo, going to try closing the gaps up with ABS paste I made with the scrap, had issues with my previous FOTK Back/Yolk cracking along the seam so want to see if this will make it stronger

Image

Post Reply