Force Pike builds

The Red Senate Guard costume as seen in Attack of the Clones

Post Reply
User avatar
NoslenLRAc
Posts: 50
Joined: Wed Sep 10, 2008 3:19 am
TKID: 2275
Location: Grand Rapids, MI

Force Pike builds

Post by NoslenLRAc »

I've started a new pike and thought I'd document the 3 versions I've done with tutorial included. It may take a while to get everything organized, but hopefully this will give some others more ideas on how to construct their own Force Pikes.

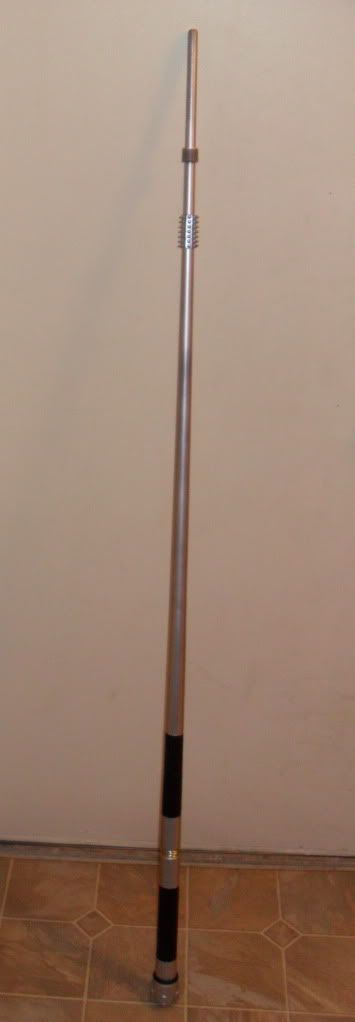
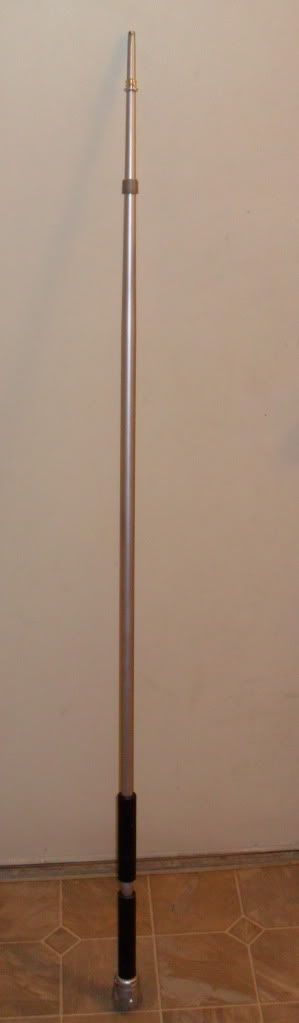
My first version was a cool looking pool cue I bought from the clearance section at a local sporting goods store. Basically, all I had to do was add a pommel (which I used a Danco replacement faucet handle). I added a couple of 0-rings to transition from this handle. The emitter is a 3/4" threaded PVC plastic adapter. I cut the threaded section off. I had 2 versions of the rasp. The first used cut out sections from a dog grooming brush I saw at pet store. It was rubber and pointed, so it wouldn't accidentally poke anyone and it looked nice. Glueing the sections on proved a challenge. I sprayed the entire pike with Rustoleum primer and metallic silver and then the grip with "Plasti-Grip" (used for covering tool handles). It looked nice, but didn't have the contours that I've seen in the pictures. It passed inspection years ago, though.

See my pics with descriptions here:
http://photobucket.com/ForcePikeV1

Image
Last edited by NoslenLRAc on Wed Jun 27, 2012 12:47 pm, edited 1 time in total.
In service of the Emperor,

TR-2275
Carl Nelson (aka Noslen L'Rac)
Image

User avatar
NoslenLRAc
Posts: 50
Joined: Wed Sep 10, 2008 3:19 am
TKID: 2275
Location: Grand Rapids, MI

Re: Force Pike builds version 2

Post by NoslenLRAc »

Here are the photos of my second version.

I bought a set of ski poles at the same sporting goods store a few years later (clearance section again, too). I removed all the hardware from the poles, except a small metal piece that connected the "basket" to the pole. It looked like a great emitter. A little sanding followed by primer on the entire section was next. I used the same Danco handle that I used in my first version. Again, it fit well. The handle was held on my tension to the lower grip. The grips are made from 3/4" pvc pipe. I did round off one edge of the upper grip for looks. I again used "Plasti-Grip" on these handles. The grips are held in place only by tension of 4 o-rings on the pole, 2 for each grip. It is a tight fit. 2 o-rings with different thicknesses are used to transition from handle to the lower grip. I did not have an emitter button on this version. Rustoleum metallic silver was again used. The emitter and rasp are held in place by tension and the paint underneath.

I thought this version looked more contoured and realistic. The only problem I had was the sprayed on Plasti-Grip needed to be reapplied, as it wore off over time. The handle of the pommel had to be touched up with paint as I would often stand at ease with the handle on the ground. Plus, kids dropping it on the ground didn't help.

Pics and descriptions here:
http://photobucket.com/ForcePikeV2

Image
Last edited by NoslenLRAc on Wed Jun 27, 2012 12:48 pm, edited 1 time in total.
In service of the Emperor,

TR-2275
Carl Nelson (aka Noslen L'Rac)
Image

User avatar
NoslenLRAc
Posts: 50
Joined: Wed Sep 10, 2008 3:19 am
TKID: 2275
Location: Grand Rapids, MI

Version 3

Post by NoslenLRAc »

Finished my latest version and finally got the photos ready. :D

This version is similar to my 2nd version. I used a ski pole as a base (one was 54" from my first pair, and the other 2 were 52" that I bought at a yard sale). I used the same style emitter, rasp, and pommel. I changed the grips a bit, as I measured them differently, added an activator button, added screws to hold the pommel (I love the ability to disassemble), hockey stick tape for the grips, and some paint variation on the pommel (3 styles).

I was searching for something better for the grip than Plasti-Grip or paint. I considered duct tape, electrical tape, tennis tape, drumstick tape, cycling tape, but settled on the hockey tape. I wish it was glossy and flexed more, but the tape itself had better adhesive.

I'll add descriptions when I have more time, but you can see the results here:
Image
(Yes, that's a cat tail in the photo.)

Here's all the photos of the processes:
http://photobucket.com/ForcePikeV3


Now for robe and bucket upgrades...
In service of the Emperor,

TR-2275
Carl Nelson (aka Noslen L'Rac)
Image

User avatar
Draft808
Posts: 34
Joined: Sun Mar 25, 2012 6:31 pm
Location: Golden Gate Garrison, CA USA

Re: Force Pike builds

Post by Draft808 »

Thanks for putting this together!
As a guard-in-progress, I find these kinds of "how i did it" posts very encouraging and a great planning resource.

What did you use for the activation button?

Post Reply