Exar's ROTJ WIP

The Imperial Royal Guard costume as seen in Return of the Jedi

User avatar
exar
Posts: 89
Joined: Fri Dec 28, 2012 11:35 pm
TKID: 13927
Location: Orlando, Florida
Contact:

Re: Exar's ROTJ WIP

Post by exar »

So I was greeted by two very nice surprises today along with this blizzard. I got a call from the custom paint shop that they had finished with my helmet. And then once I made it home I found that the mail man had delivered my visor!

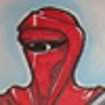
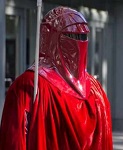
So I, much like a kid on christmass, promptly set about test fitting the visor into the helmet and grabbing a few shots to make sure its dark enough. Unless you are right up on the visor with your flash on it looks like it will be dark enough. The helmet is possibly just a shade darker than the fabric but its really really close and I have no doubt it will look great sitting on my shoulders once done.

Here's a few pics of the helm, with the visor just sitting loose inside…

Image
Image
Image

That last one where you can see inside, the camera is less than a foot away but you can see from the other shots that you can’t see inside at all without being that close.

And Jester, I'm TOTALLY not planning on doing the blaster at the same time, Just trying to thing towards the future if I needed to do anything special with the belt when I made it the first time. All I've seen on how the belt attaches is just with Velcro so far, If you guys know of a better way I'm all ears.

JesterTDA
Posts: 995
Joined: Fri Jul 23, 2010 3:10 am
TKID: 9392

Re: Exar's ROTJ WIP

Post by JesterTDA »

My belt was held in place with velcro and only during one troop did I run into an issue with it faling off. Now my belt is held in place by a 1" nylon webbing with an adjustable buckle on it. I like how I know it'll be set up right evertime instead of needing to worry about the velcro being lined up right.

User avatar
exar
Posts: 89
Joined: Fri Dec 28, 2012 11:35 pm
TKID: 13927
Location: Orlando, Florida
Contact:

Re: Exar's ROTJ WIP

Post by exar »

At long last the inner robe has been completed. I think it came out rather well. As in i can feel my leg hairs inside my boots when I walk! The Belt looks especially great. And the rope belt completes the look. A local friend of mine gave me a wonderful suggestion for the gloves. She has had bridesmaids gloves and shoes dyed to match dresses before, and claimed it was pretty cheap. SOOO guess what i'll be looking into this weekend.
However I am having a major issue with static. Anyone else have the same issue, or good ways to deal with it? I've tried a dryer sheet, and paperclips on the bottom hem so far (couldn't find safety pins) And so far the clips have helped the most but i still have a lot of static to deal with.

Image

I am also finishing up a mobile job box to help store and possibly transport the whole costume. Its defiantly bigger than I had planed on, but it seemed that the next size down wouldn't quite fit the helmet. And as a bonus if I drop this one onto the freeway, i think my gear will survive.

User avatar
stripes
Former DL
Posts: 2079
Joined: Tue Sep 23, 2008 1:46 am
TKID: 3676
Location: Calgary, Alberta, Canada
Contact:

Re: Exar's ROTJ WIP

Post by stripes »

For the static, assuming your inner robe is washable... use some fabric softener when you wash them and that should do the trick...
Image

User avatar
exar
Posts: 89
Joined: Fri Dec 28, 2012 11:35 pm
TKID: 13927
Location: Orlando, Florida
Contact:

Re: Exar's ROTJ WIP

Post by exar »

With a lot of hard work done by some of my very talented friends I have my final product finished and ready for approval into the 501st. The outer robe ended up being a cross between a bible robe pattern and a graduation robe pattern to get that wonderful flow look. First thing I noticed after putting the lid on… You guys arnt kidding about it being HOT. Fans will be in the near future list. lol


Here are the pics from the shoot… Interestingly in some of the shots the bucket seems to match closer to the color of the inner robe than that of the outer. So i took a few in just natural sunlight to give a different impression as to the color.

ImageImage
ImageImage
ImageImage
ImageImage
ImageImage
ImageImage

User avatar
stripes
Former DL
Posts: 2079
Joined: Tue Sep 23, 2008 1:46 am
TKID: 3676
Location: Calgary, Alberta, Canada
Contact:

Re: Exar's ROTJ WIP

Post by stripes »

The only critique I have from what I can see right now is your arm slit should be up to your armpit, not at your waist. This will allow for more freedom of movement and is also a safety issue.
Image

User avatar
exar
Posts: 89
Joined: Fri Dec 28, 2012 11:35 pm
TKID: 13927
Location: Orlando, Florida
Contact:

Re: Exar's ROTJ WIP

Post by exar »

Thanks Stripes,
I was thinking it may be a bit low, but was going to try wearing that way to find out before moving it up a few inches.

User avatar
stripes
Former DL
Posts: 2079
Joined: Tue Sep 23, 2008 1:46 am
TKID: 3676
Location: Calgary, Alberta, Canada
Contact:

Re: Exar's ROTJ WIP

Post by stripes »

To match the CRL's for approval, you'll need the slit at the armpit
Image

User avatar
exar
Posts: 89
Joined: Fri Dec 28, 2012 11:35 pm
TKID: 13927
Location: Orlando, Florida
Contact:

Re: Exar's ROTJ WIP

Post by exar »

Well in that case i'll change that right away. Problem with a short torso, its only about 4 inches. lol

User avatar
exar
Posts: 89
Joined: Fri Dec 28, 2012 11:35 pm
TKID: 13927
Location: Orlando, Florida
Contact:

Re: Exar's ROTJ WIP

Post by exar »

All done Stripes, That is is up to the underarm. I have to say that you were right about the movement. Much easier to move around in.
Here is a quick pic just to see the length.

Image

Post Reply