I'm going to start with my build plan and basic pricing.
GLOVES ($66)
The gloves will be a pair of
Royal Guard Real Leather Gloves ($66), except made in black. They will include a pair of snaps at the wrist to secure to the flight suit.
BELT & BUCKLE ($25+Belt)
The belt will be an Imperial black belt with grooves. It will include a
Star Wars Imperial Officer Belt Buckle ($15) with a
Disk / Imperial Disk / Insignias / Greeblies, High Detail Disk ($10) screwed onto the face. Finally, the main belt will be hand-made leather and include the two groove lines on the top and bottom of the belt. A length of Velcro will be attached to the inside to secure it to the bodysuit.
BOOTS ($349)
The boots are a set of
Star Trek 2nd Generation ($349). They will be modified to include a set of four grommets on the sides for the boot armor.
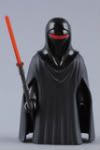
ARMOR KIT ($447)
The armor kit includes the helmet, chest plate, back plate, abdominal plate, shoulder plates, gauntlets, shin plates, and boot plates ($360). All pieces will be prepared in a specific way. When received, each piece will be thoroughly cleaned with soap and warm water then dried. The helmet visor will be cut out/modified at this time (if needed).
The entire surface (inside, outside, front, and back) will be sanded down by hand. It will be washed again. At this point, the outer surface will be bondoed smooth. Once bondoed it will be sanded again and washed. This will be repeated until there are no more imperfections in the surface.
Certain points on the underside of the armor will be sanded rough for various attachments. Female snaps epoxied at the corners of the abdominal armor and masked off. Four brackets will be CA glued to the shins, on the insides of the tapered edge, as well as a belt clip, on the center where the boot top would be, and masked off. A set of four Chicago screws will be epoxied to the boot armor and masked off. A set of three Chicago screws will be epoxied to the shoulders and sides of the armor and masked off. The back plate will have a similar series of three Chicago screws at the same points and masked similarly. Finally, three longer Chicago screws will be attached to the shoulders and masked off.
All armor pieces will be given a coat of black primer (front and back, inside and out), then sanded down, and washed. A second layer of primer will be painted onto the outside and inside the lip of the inner surface, sanded, and washed again.
The outer surface (and lip) will be painted with the gloss black. It will be micro-sanded and washed. A second layer of gloss black will be added. This second layer will be sanded with a very fine sand paper then washed. A third layer will be added and polished when dry.
Finally, two layers of clear coat will be placed over the outer surface (and lip). After dry, it will be washed once more and polished.
All masking will be removed. Velcro dots will be adhered inside the top of the gauntlets as well as around the edges of the abdominal armor and on either side of the inside of the visor.
Shoulder straps will be prepared for the chest and back armor with six grommets. Side straps will be prepared as well with grommets and side-release buckles to secure it shut.
A pair of foam rubber ½-inch kneepads will be painted black with latex paint and finished to use as padding under the shoulder armor with holes for the Chicago screws to separate the Chicago screws from the shoulders of the body suit and set it apart from the shoulders.
A pair of black neoprene bands will be attached to the shin tabs and Velcro together in the rear.
The visor will be a
Royal Guard Helmet RED Visor Lensse PROP for 1:1 Big ($21) unless I can find someone to produce a mirrored red one. It will be installed behind the visor cutout with Velcro on the left and sight sides. A red EL wire will run around the visor to cause a glow.
The cooling system will include a set of two
Star Wars stormtrooper helmet prop squirrel fan kit ($40) installed above and below the visor. Additionally, a
Penn Plax Auto-On Silent Battery Operated Air Pump ($26) will be installed behind the chest plate with a tube running up in front of the mouth for air. Light padding will be installed around the helmet to ensure a good fit while allowing airflow.
BODYSUIT / KAMA (~$100)
The bodysuit will be custom made with a black gabardine or possibly cotton material. It will be based on a flight suit pattern, but without any pockets. It will include stirrups for the hands and feet to keep it in the gloves and boots, respectively. A light neck seal will be included in the design (an extension of the collar). It will zip up the front and the zipper flap will Velcro down below the belt-line.
A length of sew-on Velcro will be located around the waist of the body suit to secure the belt. A set of grommets will be located on the upper arms for the shoulder armor. A set of sew-on Velcro will be attached to the top of the wrists (above the gloves) to secure to the gauntlets. Finally, a set of snaps and Velcro will be located on the abdomen to secure the abdominal armor.
A kama will be sewn onto the back of the body suit under the Velcro for the belt. It will extend down to below the backs of the knees (rear kilt length). The outer material will be black velvet with the inner/lining material being the same material as the flight suit. The width is from the left to the right seam of the bodysuit.
ROBE (~$100)
The robe will be custom made from black velvet with a lining in the material of the body suit. It will be made with the pattern and modifications detailed in the Episode II robe descriptions. There will be a slit up the back for proper drape and wear. Finally, there will be reinforcement around the neck that is black in color. The robe will pull over the head.
LIGHTSABER PIKE (~$50)
The Lightsaber Pike will initially be a hardware store pike. The blade will be a
Crimson Red Battle Blade ($23). The body of the pike will be made from a 66” length of 1” O.D. PVC pipe with a ¾” I.D. Three sets of greeblies will be CA glued to it. The emitter greeblie will include a thumbscrew to hold the battle blade. In addition, a rubberized cap will be included over the end (for safety). When completed, it will be washed, primed in black, painted gloss black, and given a gloss finish.
When financially feasible, the lightsaber pike will be ordered from a custom saber maker to utilize the Battle Blade with a Luxeon LED under it. It will be detachable to separate just above the lower greeblie. The battle blade will be able to fit inside the lower section of the saber for storage and travel.