Draft808's Glaive Build
Posted: Wed Feb 27, 2019 9:56 am
Hi all.
Thought I'd share a build I've been working on.

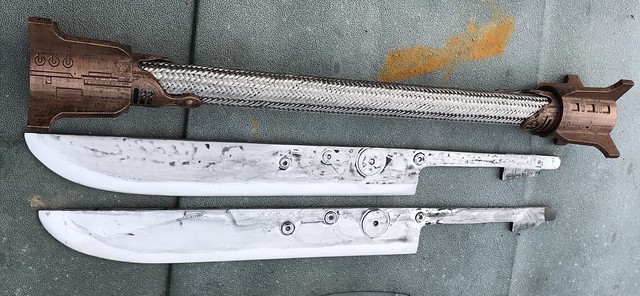
Putting the kit parts together, here's what I've used:
-1"ID x 24" PVC Pipe (Schedule 40)
-Stainless steel braided sleeving
-Black spray primer
-Hammered copper spray paint
-Chrome spray paint or shiny/metalic silver of choice
-Black acrylic (watered down for wash)
-1/4" thick plastic sheet for blades
-Washers (various sizes)
-Thin aluminum strip
-epoxy glue
-cyanoacrylate glue
-3D printed endcaps
The following is pretty close to how I went about building it, I'll share for whatever worth it may be to any intrepid builders:
-Ensure fit of endcaps on pipe. Mark ends of the endcap's collar-to-pipe on PVC pipe. Also mark end of endcap undercut-neck coverage on pipe.
-Sand pipe and blacken with primer. Protect your marking from earlier with masking tape.
-Slide stainless steel braiding onto pipe. Stretch to fit tight to pipe. Cut sleeving to length. It should end between the endcap's collar-to-pipe and undercut-neck marks we made earlier, err closer to the collar mark. I found tightly wrapping the sleeving with electrical tape then cutting with a dremel cutoff wheel through the tape while on the pipe worked well for trimming this material to length.
-Anchor braided sleeving to pipe with epoxy.
-Sand print line on endcaps, or filler primer then sand, or whatever your preferred method...make it pretty and smooth. (I skipped this part, if you use my version 1 model, don't skip this part for best results.)
-Paint endcap.
-Cut blade shape. Shape edge to desired false edge shape. Relief cuts and thickening at base recomended to seat in pipe securely.
-Devise method of fixing blade to endcap and the endcap to the pipe. Forethought here will make thing easier later. Mine is pressure fit into the pipe end. Perhaps a ball-detent pin would be better.
-Layout washers and thin aluminum strips to replicate visual reference for blade circuitry. Glue in place. Typical, 4 places, either side of both blades.
-Paint blade. I recommended to using a second tone of metallic for the blade edge of a slightly different color from that used on the rest of the blade (think "Hamon" for inspiration).
-wash everything in black acrylic to weather to desired level. Thin for highlighting crevices, thick for grime and tarnish. Don't wash the blade edge, keep it shiny.
-Affix endcaps to pipe assembly to form the glaive handle assembly.
-Affix blades to glaive handle assembly.
-Stand proud with your glaive.
-Dual your brethren for the honor of serving the Emperor.
-Go make new blades because the last part there was rethorical and we all should have seen the broken blades coming.
For those interested in the endcaps, I modeled these myself. I'll work on getting them up for download somewhere for those interested. PM me for details. I'm also trying to work on a few variations for the different instances that can be seen throughout the comics; 4 fin, 3 fin, wide activator switch, skeletal activation switch, circuit cylinder, ribbed cylinder, various fin shapes/orientations.
Also, I've been told 1/4" prop blade thickness is rubbish for troop-able props, even if made of acrylic or expanded PVC foam board(sintra/komatex). What do you folks use? What thickness and material works for you?
Thought I'd share a build I've been working on.
Putting the kit parts together, here's what I've used:
-1"ID x 24" PVC Pipe (Schedule 40)
-Stainless steel braided sleeving
-Black spray primer
-Hammered copper spray paint
-Chrome spray paint or shiny/metalic silver of choice
-Black acrylic (watered down for wash)
-1/4" thick plastic sheet for blades
-Washers (various sizes)
-Thin aluminum strip
-epoxy glue
-cyanoacrylate glue
-3D printed endcaps
The following is pretty close to how I went about building it, I'll share for whatever worth it may be to any intrepid builders:
-Ensure fit of endcaps on pipe. Mark ends of the endcap's collar-to-pipe on PVC pipe. Also mark end of endcap undercut-neck coverage on pipe.
-Sand pipe and blacken with primer. Protect your marking from earlier with masking tape.
-Slide stainless steel braiding onto pipe. Stretch to fit tight to pipe. Cut sleeving to length. It should end between the endcap's collar-to-pipe and undercut-neck marks we made earlier, err closer to the collar mark. I found tightly wrapping the sleeving with electrical tape then cutting with a dremel cutoff wheel through the tape while on the pipe worked well for trimming this material to length.
-Anchor braided sleeving to pipe with epoxy.
-Sand print line on endcaps, or filler primer then sand, or whatever your preferred method...make it pretty and smooth. (I skipped this part, if you use my version 1 model, don't skip this part for best results.)
-Paint endcap.
-Cut blade shape. Shape edge to desired false edge shape. Relief cuts and thickening at base recomended to seat in pipe securely.
-Devise method of fixing blade to endcap and the endcap to the pipe. Forethought here will make thing easier later. Mine is pressure fit into the pipe end. Perhaps a ball-detent pin would be better.
-Layout washers and thin aluminum strips to replicate visual reference for blade circuitry. Glue in place. Typical, 4 places, either side of both blades.
-Paint blade. I recommended to using a second tone of metallic for the blade edge of a slightly different color from that used on the rest of the blade (think "Hamon" for inspiration).
-wash everything in black acrylic to weather to desired level. Thin for highlighting crevices, thick for grime and tarnish. Don't wash the blade edge, keep it shiny.
-Affix endcaps to pipe assembly to form the glaive handle assembly.
-Affix blades to glaive handle assembly.
-Stand proud with your glaive.
-Dual your brethren for the honor of serving the Emperor.
-Go make new blades because the last part there was rethorical and we all should have seen the broken blades coming.
For those interested in the endcaps, I modeled these myself. I'll work on getting them up for download somewhere for those interested. PM me for details. I'm also trying to work on a few variations for the different instances that can be seen throughout the comics; 4 fin, 3 fin, wide activator switch, skeletal activation switch, circuit cylinder, ribbed cylinder, various fin shapes/orientations.
Also, I've been told 1/4" prop blade thickness is rubbish for troop-able props, even if made of acrylic or expanded PVC foam board(sintra/komatex). What do you folks use? What thickness and material works for you?